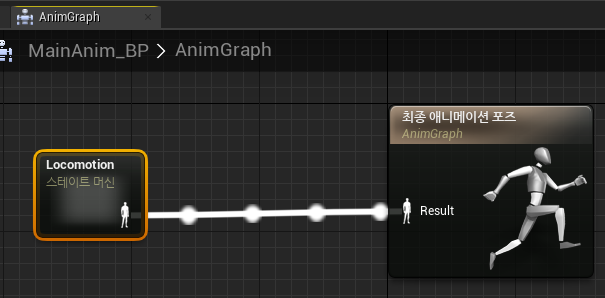
필요한 애니메이션도 모두 받아서 Import 하는데 스켈레탈 메시는 캐슬 가드를 골라주도록 한다.
[35. The Character Class #1]
Character를 상속받은 C++ 클래스를 Main 이라는 이름으로 생성한다.
ACharacter를 상속받게 되는데, 이 부모 클래스에 USkeletalMeshComponent* 타입의 Mesh라는 변수가 이미 선언되어있다.
그 외에 CharacterMovement, CapsuleComponent도 같이 선언되어 있고 CapsuleComponent가 루트 컴포넌트가 된다.
루트 컴포넌트가 될 수 있는것은 CapsuleComponent 뿐이다.
private:
	/** The main skeletal mesh associated with this Character (optional sub-object). */
	UPROPERTY(Category=Character, VisibleAnywhere, BlueprintReadOnly, meta=(AllowPrivateAccess = "true"))
	USkeletalMeshComponent* Mesh;
UPROPERTY 속성의 meta=(Allow..) 키워드는 private임에도 에디터에서 보이게 한다.
블루프린트 내부에서 접근할 수 있지만 외부에서는 접근할 수 없다.
// Main.h
public:
    /* Camera boom positioning the camera behind the player	*/
    UPROPERTY(VisibleAnywhere, BlueprintReadOnly, Category = Camera, meta = (AllowPrivateAccess=true))
    class USpringArmComponent* CameraBoom;

    /* Follow Camera */
    UPROPERTY(VisibleAnywhere, BlueprintReadOnly, Category = Camera, meta = (AllowPrivateAccess = true))
    class UCameraComponent* FollowCamera;

// Main.cpp
#include "GameFramework/SpringArmComponent.h"
#include "Camera/CameraComponent.h"

AMain::AMain()
{
    // Set this character to call Tick() every frame.  You can turn this off to improve performance if you don't need it.
    PrimaryActorTick.bCanEverTick = true;

    // Create Camera Boom (pulls towards the player if there's a collision)
    CameraBoom = CreateDefaultSubobject<USpringArmComponent>(TEXT("CameraBoom"));
    CameraBoom->SetupAttachment(GetRootComponent());
    CameraBoom->TargetArmLength = 600.f; // Camera follows at this distance
    CameraBoom->bUsePawnControlRotation = true; // Rotate arm based on controller

    // Create Follow Camera
    FollowCamera = CreateDefaultSubobject<UCameraComponent>(TEXT("FollowCamera"));
    FollowCamera->SetupAttachment(CameraBoom, USpringArmComponent::SocketName);
    // Attach the camera to the end of the boom and let the boom adjust to match
    // the controller orientation
    FollowCamera->bUsePawnControlRotation = false;
}
bUsePawnControlRotation는 컨트롤러의 회전을 따라갈 것인가를 정하는 것이다.
스프링 암은 컨트롤러를 따라가는 것이 좋고, 카메라는 스프링암을 따라가야 하기 때문에 각각 true/false로 둔다.
빌드를 하고 블루프린트 클래스로 만들어둔다.
[36. The Character Class #2]
스켈레탈 메시를 우리가 받은것으로 설정하고 캡슐 컴포넌트의 크기도 캐릭터와 맞게 대략적으로 맞춰준다.
메시의 y축과 화살표의 방향도 맞춰준다.
조작을 구현할 차례이다.
이전의 폰에서 마우스 움직임으로 회전을 구현했을 때는 마우스 이동시 캐릭터가 회전하기 때문에 하위 계층의 스프링 암과 카메라가 움직이는 방식이었다면 이번에는 카메라만 회전시키는 방식으로 구현해 본다.
부모 클래스인 ACharacter에 포함된 CharacterMovementComponent에 접근하여 사용한다.
사용하기 전에 nullptr 여부를 검사하고 사용하는 것이 좋다.
// Main.h
public:
    /* Base turn rates to scale turning functions for the camera */
    UPROPERTY(VisibleAnywhere, BlueprintReadOnly, Category = Camera)
    float BaseTurnRate;
    UPROPERTY(VisibleAnywhere, BlueprintReadOnly, Category = Camera)
    float BaseLookUpRate;

// Main.cpp
AMain::AMain()
{
    // Set our turn rates for input
    BaseTurnRate = 65.f;
    BaseLookUpRate = 65.f;
}

/* Called for forwards/backwards input */
void AMain::MoveForward(float Value)
{
    if ((Controller != nullptr) && (Value != 0.0f))
    {
        // find out which way is forward
        const FRotator Rotation = Controller->GetControlRotation();
        const FRotator YawRotation(0.f, Rotation.Yaw, 0.f);

        // FRotationMatrix: FRotator를 회전행렬로 변환한다.
        // GetUnitAxis: 특정 축을 정규화 한것을 반환한다.
        const FVector Direction = FRotationMatrix(OUT YawRotation).GetUnitAxis(EAxis::X);
        AddMovementInput(Direction, Value);
    }
}

/* Called for side to side input */
void AMain::MoveRight(float Value)
{
    if ((Controller != nullptr) && (Value != 0.0f))
    {
        // find out which way is forward
        const FRotator Rotation = Controller->GetControlRotation();
        const FRotator YawRotation(0.f, Rotation.Yaw, 0.f);

        const FVector Direction = FRotationMatrix(OUT YawRotation).GetUnitAxis(EAxis::Y);
        AddMovementInput(Direction, Value);
    }
}
FRotationMatrix로 Rotator를 회전 행렬로 변환하고 거기서 X축에 대한 정규 벡터를 반환받고 이것이 방향 벡터가 된다.
유의해야 하는 점은 Direction은 메시의 방향벡터가 아닌 컨트롤러(마우스)의 방향벡터이다.
차후 마우스 움직임과 메시의 회전을 분리시키고 이동 자체는 마우스의 방향을 따라가도록 하기 위함이다.
[37. The Character Class #3]
키보드 조작과 마우스 조작 둘 다 구현해본다.
// Main.h
/* Called via input to turn at a given rate
* @param Rate This is a normalized rate, i.e. 1.0 means 100% of desired turn rate
*/
void TurnAtRate(float Rate);

/* Called via input to look up/down at a given rate
* @param Rate This is a normalized rate, i.e. 1.0 means 100% of desired look up/down rate
*/
void LookUpAtRate(float Rate);


// Main.cpp
void AMain::SetupPlayerInputComponent(UInputComponent* PlayerInputComponent)
{
    Super::SetupPlayerInputComponent(PlayerInputComponent);
    check(PlayerInputComponent);

    PlayerInputComponent->BindAction("Jump", IE_Pressed, this, &ACharacter::Jump);
    PlayerInputComponent->BindAction("Jump", IE_Released, this, &ACharacter::StopJumping);

    PlayerInputComponent->BindAxis("MoveForward", this, &AMain::MoveForward);
    PlayerInputComponent->BindAxis("MoveRight", this, &AMain::MoveRight);

    PlayerInputComponent->BindAxis("Turn", this, &APawn::AddControllerYawInput);
    PlayerInputComponent->BindAxis("LookUp", this, &APawn::AddControllerPitchInput);
    PlayerInputComponent->BindAxis("TurnRate", this, &AMain::TurnAtRate);
    PlayerInputComponent->BindAxis("LookUpRate", this, &AMain::LookUpAtRate);
}

void AMain::TurnAtRate(float Rate)
{
    AddControllerYawInput(Rate * BaseTurnRate * GetWorld()->GetDeltaSeconds());
}


void AMain::LookUpAtRate(float Rate)
{
    AddControllerPitchInput(Rate * BaseLookUpRate * GetWorld()->GetDeltaSeconds());
}
위의 두개는 Pawn의 AddControllerYawInput을 바인딩 하고 아래 두개는 따로 만든것을 바인딩한다.
하지만 따로 만든 함수의 내용도 보면 똑같이 AddControllerYawInput을 호출한다.
차이점이 있다면 위의 두개는 마우스 이동을 위해서 상위 클래스의 함수를 바로 바인딩 한거고 아래 두개는 키보드로 회전을 하려면 별도의 계수가 필요하므로 계산식을 추가한 것이다.
BaseTurnRate, BaseLookUpRate가 클수록 회전 속도는 빠르게 될 것이다. 부드러운 회전을 위해 델타타임을 곱해주면 부드럽게 회전이 된다.
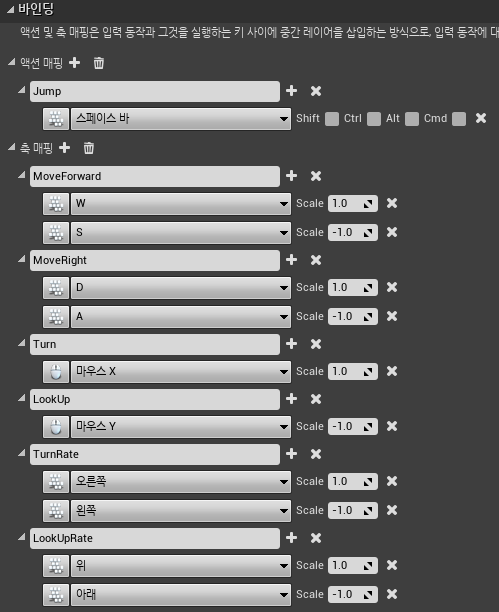
프로젝트 세팅의 바인딩도 수정해 주어야 한다.
추가로 BindAxis는 매 틱마다 함수를 호출하는데 비해 BindAction은 이벤트가 발생할 때만 호출되기 때문에 조금 더 최적화가 되어있다.
Pawn의 컨트롤을 구현할 때와는 달리 별다른 코딩을 하지 않고 상위 클래스의 컨트롤러를 상속받아 사용했다.
만약 추가적인 구현이 필요하다면 오버라이딩이 가능한지 확인 후 오버라이딩 해서 사용하면 될 것이다.
아직은 카메라만 따로 회전하는게 아니라 캐릭터가 회전하고 있지만 곧 수정하게 될 것이다.
[38. The Character Class #4]
가끔 C++ 코드를 변경했음에도 기반으로 하는 블루프린트 클래스가 변화하지 않는다면 에디터를 껐다가 켜보고 그럼에도 안되면 블루프린트 클래스를 삭제했다가 재생성하는 방법을 이용해야 한다.
다만 블루프린트 클래스의 값이 변하지 않았다고 무작정 삭제하기 전에 값 되돌리기 버튼을 눌러서 하드코딩한 값이 적용되는지 확인하고 진행해야 한다.
이제 카메라의 회전과 캐릭터의 회전을 분리시켜보도록 한다. 매우 간단하다.
// Main.cpp
AMain::AMain()
{
    // Don't rotate when the controller rotates.
    // Let that just affect the camera.
    bUseControllerRotationYaw = false;
    bUseControllerRotationPitch = false;
    bUseControllerRotationRoll = false;
}
특정 축만 false로 만들수도 있지만 지금은 모든 축에 대해 컨트롤러 조작시 캐릭터가 회전하지 않도록 한다.
실행 시 카메라(정확하게는 스프링 암)의 회전과 캐릭터의 회전이 분리가 되었고 W키를 입력시 카메라가 바라보는 방향으로 이동한다.
상속받은 Character 클래스에 포함된 CharacterMovementComponent는 굉장히 많은 변수와 기능이 포함되어있다.
AMain::AMain()
{
    // Configure character movement
    GetCharacterMovement()->bOrientRotationToMovement = true; // Character moves in the direction of input...
    GetCharacterMovement()->RotationRate = FRotator(0.f, 540.f, 0.f); // ...at this rotation rate
    GetCharacterMovement()->JumpZVelocity = 650.f;
    GetCharacterMovement()->AirControl = 0.2f;
}
bOrientRotationToMovement는 true시 RotationRate를 회전 변경 속도로 사용하여 캐릭터를 가속 방향으로 회전시킨다.
W키를 누른 상태에서 카메라를 돌리거나 ASD키로 움직일 시 캐릭터가 회전하게 된다.
즉, 회전 보간이 적용된다.
RotationRate는 회전의 속도라고 보면 된다.
JumpZVelocity는 점프의 가속도, AirControl은 캐릭터의 공중 조작의 자유도라고 보면 된다.
// ColliderMovementComponent.h
virtual void TickComponent(float DeltaTime, enum ELevelTick TickType, FActorComponentTickFunction* ThisTickFunction) override;

// ColliderMovementComponent.cpp
void UColliderMovementComponent::TickComponent(float DeltaTime, enum ELevelTick TickType, FActorComponentTickFunction* ThisTickFunction)
{
    Super::TickComponent(DeltaTime, TickType, ThisTickFunction);

    if (!PawnOwner || !UpdatedComponent || ShouldSkipUpdate(DeltaTime))
    {
    	return;
    }

    FVector DesiredMovementThisFrame = ConsumeInputVector().GetClampedToMaxSize(1.f);

    if (!DesiredMovementThisFrame.IsNearlyZero())
    {
        FHitResult Hit;
        SafeMoveUpdatedComponent(OUT DesiredMovementThisFrame, OUT UpdatedComponent->GetComponentRotation(), true, OUT Hit);

        // if we bump into something, slide along the side of it
        if (Hit.IsValidBlockingHit())
        {
        	SlideAlongSurface(DesiredMovementThisFrame, 1.f - Hit.Time, Hit.Normal, Hit);
        }
    }
}
폰이나 액터 클래스 생성시 기본으로 있던 Tick 함수를 똑같이 오버라이딩 한 것과 같다.
컴포넌트이기때문에 함수명이 TickComponent이다.
마찬가지로 Super의 TickComponent를 호출해주고 내용을 작성한다.
MovementComponent가 폰을 소유하지 않거나, MovementComponent가 제어할 컴포넌트가 없거나, 스킵해야 하는 경우 Tick을 즉시 종료한다.
DesiredMovementThisFrame에 대입하는 ConsumInputVector는 Collider에서 정의했던 MoveForward, MoveRight에 의해서 ControllInputVector라는 변수에 값이 계속 누적된다. (다만 입력이 없으면 0이 계속 곱해지기 때문에 0만 더해짐)
ConsumInputVector를 호출하면 누적된 값을 반환받고 ControllInputVector는 0으로 초기화된다.
그 뒤, 최대 크기가 1.f로 고정된 벡터의 복사본을 통해 값을 보정한다.
해당 값이 0에 근접하지 않다면 움직이게 된다.
마지막으로 만약 물체와 부딪혔다면, 해당 물체에 충돌한 상태로 가만히 있는게 아니라 조금씩 미끄러져서 움직이게 한다.
[30. Pawn Movement Component #2]
우선 마켓플레이스에서 Infinity Blade: Adversaries를 다운 받는다.
이제 Critter에 Static Mesh 대신 Skeletal Mesh를 사용할 것이기 때문에 StaticmeshComponent를 SkeletalMeshComponent로 변경해준다.
그리고 더이상 컨트롤하지 않을 것이기 때문에 AutoPossessPlayer도 주석처리를 해준다.
그럼에도 불구하고 실행 시 해당 폰으로 빙의가 된다면 블루프린트 클래스에서 해당 옵션이 설정되어 있는지 확인 후 비활성화 시켜준다.
메시는 SK_Greater_Spider, 애니메이션은 ExoGame_Greater_Spider_Idle로 설정한다.
AutoPossessPlayer
레벨이 시작될 때나 폰이 생성될 때, 자동으로 폰을 소유해야 하는 플레이어 컨트롤러를 결정한다.

AutoPossessPlayer = EAutoReceiveInput::Player0;
[Method]
GetDeltaSeconds()
DeltaSeconds를 받아온다.

GetWorld()->GetDeltaSeconds()
// GetWorld()는 AActor에 오버라이딩 되어있다
// 만약 헤더파일을 포함해야 한다면 "Engine/World.h"
GetWorldTimerManager().SetTimer(타이머 핸들, 메소드, 간격, 반복 여부, 몇초간 실행할지)
일정 시간 뒤에 재생될 함수를 등록한다.
SpawnActor<>()
월드에 새로운 객체를 생성시킨다.
템플릿 타입에는 어떤 타입을 생성시킬지 알려주는것뿐이다.
그래서 해당 클래스의 생성자에서 메시를 생성시키지 않는 이상,
본질적으로는 보이지 않는 액터가 생성된다.
하지만 UClass 타입에 블루프린트 클래스를 넘겨준다면
블루프린트를 기반으로 새 객체를 만들어준다.
FMath::GetMappedRangeValueClamped(const Vector2D &InputRange,
    const Vector2D &OutputRange, const float Value);

Value를 InputRange 범위에 대해서 OutputRange 백분율로 반환해준다.
/* 예시 */
Vector2D Input(0.f, 600.f);
Vector2D Output(0.f, 1.f);
float Result = FMath::GetMappedRangeValueClamped(Input, Output, 150.f);
// Result : 0.25f
[UPROPERTY]
Category
디테일 탭에서 그룹화를 시켜주고 이름을 지정한다
'|' 로 구분하면 오른쪽이 왼쪽의 하위 분류로 들어간다

Catagory="Tag#1 | Tag#2"


meta
AllowPrivateAccess = "true" : private이라도 접근이 가능하게 한다
ClampMin = "0.0", ClampMax = "1.0" : 값을 0~1 사이로 제한한다
UIMin = "0.0", UIMax = "1.0" : 에디터 패널에서 값이 표시되는 비율을 설정한다
CreateDefaultSubobject<T>(TEXT(""));
액터의 컴포넌트들을 생성한다.
실제 레벨에서 스폰 될 때, 매 액터 객체마다 컴포넌트를 설정하는 비용을 줄일 수 있다.
생성자에서 하는 것이 좋다.

MeshComponent = CreateDefaultSubobject<UStaticMeshComponent>(TEXT("MeshComponent"));
[Component]
SetupAttachment(부모 컴포넌트, 소켓 이름=None)
부모 컴포넌트의 자식 계층으로 설정한다.
소켓 이름을 지정한 경우 계층뿐만 아니라 소켓 위치로 원점이 정해진다.

MeshComponent->SetupAttachment(GetRootComponent());
AttachToComponent(부모 컴포넌트, 부착 규칙, 소켓 이름=None)
부모 컴포넌트의 자식 계층으로 설정한다.
소켓 이름을 지정한 경우 계층뿐만 아니라 소켓 위치로 원점이 정해진다.
생성자에서 사용하지 않는다.
[SpringArmComponent]
주로 카메라 컴포넌트의 부모로 설정한다.
장애물을 등지더라도 충돌처리가 이루어져서 카메라가 오브젝트를 뚫지 않는다.
bEnableCameraLag
true인 경우 카메라가 따라갈 때 딜레이를 준다.

SpringArm->bEnableCameraLag = true;
// Critter.h
public:
    UPROPERTY(EditAnywhere)
    UStaticMeshComponent* MeshComponent;

    UPROPERTY(EditAnywhere)
    class UCameraComponent* Camera;

// Critter.cpp
#include "Camera/CameraComponent.h"

ACritter::ACritter()
{
    // Set this pawn to call Tick() every frame.  You can turn this off to improve performance if you don't need it.
    PrimaryActorTick.bCanEverTick = true;

    RootComponent = CreateDefaultSubobject<USceneComponent>(TEXT("RootComponent"));
    MeshComponent = CreateDefaultSubobject<UStaticMeshComponent>(TEXT("MeshComponent"));

    MeshComponent->SetupAttachment(GetRootComponent());

    Camera = CreateDefaultSubobject<UCameraComponent>(TEXT("Camera"));
    Camera->SetupAttachment(GetRootComponent());
    Camera->SetRelativeLocation(FVector(-300.f, 0.f, 300.f));
    Camera->SetRelativeRotation(FRotator(-45.f, 0.f, 0.f));
}
C++ 클래스로 폰을 상속받아 만든 후 블루프린트 클래스로 만들어서 월드에 배치하면 액터를 배치했던 것 처럼 따로 조작하거나 해당 폰의 카메라로 보거나 하지 않는다.