[42. Floor Switch #1]
상호작용(interaction) 가능한 구성요소를 만든다.
트리거는 액터를 상속받아서 만든다. 이름은 FloorSwitch로 짓는다.
보이지는 않지만 충돌을 감지할 트리거, 그리고 눈에 보여지는 메시를 가지고 있어야 한다.
// FloorSwitch.h
public:
    /* Overlap volume for functionality to be triggered */
    UPROPERTY(VisibleAnywhere, BlueprintReadWrite, Category = "Floor Switch")
    class UBoxComponent* TriggerBox;

    /* Switch for the character to step on */
    UPROPERTY(VisibleAnywhere, BlueprintReadWrite, Category = "Floor Switch")
    UStaticMeshComponent* FloorSwitch;

    /* Door to move when the floor switch is stepped on */
    UPROPERTY(VisibleAnywhere, BlueprintReadWrite, Category = "Floor Switch")
    UStaticMeshComponent* Door;

// FloorSwitch.cpp
#include "Components/BoxComponent.h"

AFloorSwitch::AFloorSwitch()
{
    // Set this actor to call Tick() every frame.  You can turn this off to improve performance if you don't need it.
    PrimaryActorTick.bCanEverTick = true;

    TriggerBox = CreateDefaultSubobject<UBoxComponent>(TEXT("TriggerBox"));
    SetRootComponent(TriggerBox);

    FloorSwitch = CreateDefaultSubobject<UStaticMeshComponent>(TEXT("FloorSwitch"));
    FloorSwitch->SetupAttachment(GetRootComponent());

    Door = CreateDefaultSubobject<UStaticMeshComponent>(TEXT("Door"));
    Door->SetupAttachment(GetRootComponent());
}
앞서 하던대로 컴포넌트들을 생성해주고 TriggerBox를 루트 컴포넌트로 지정하고 계층 구조를 설정한다.
이제 TriggerBox와 충돌시 실행할 함수를 바인딩 할 차례이다.
// FloorSwitch.h
public:
    UFUNCTION()
    void OnOverlapBegin(UPrimitiveComponent* OverlappedComponent, AActor* OtherActor, UPrimitiveComponent* OtherComp, int32 OtherBodyIndex, bool bFromSweep, const FHitResult& SweepResult);

// FloorSwitch.cpp
void AFloorSwitch::BeginPlay()
{
    Super::BeginPlay();
    TriggerBox->OnComponentBeginOverlap.AddDynamic(this, &AFloorSwitch::OnOverlapBegin);
}
OnOverlapBegin의 매개변수가 저렇게 많은 이유는 동적 멀티캐스팅 델리게이트가 저렇게 만들어져 있기 때문이다.
임의로 지정한 것이 아니고 OnComponentBeginOverlap의 정의를 따라서 들어가보면 확인할 수 있다.
바인딩은 생성자보다는 그 후에 해주는것이 좋다.
이 실습에서는 BeginPlay에서 했지만 여기에서는 PostInitializeComponents를 오버라이딩 해서 바인딩 했다.
PostIntializeComponents가 BeginPlay보다 더 일찍 실행된다. 우선 여기서는 실습을 따라가도록 한다.
충돌이 일어났다가 벗어날 때 실행할 함수에 대한 바인딩도 필요하다.
// FloorSwitch.h
UFUNCTION()
void OnOverlapEnd(UPrimitiveComponent* OverlappedComponent, AActor* OtherActor, UPrimitiveComponent* OtherComp, int32 OtherBodyIndex);

// FloorSwitch.cpp
TriggerBox->OnComponentEndOverlap.AddDynamic(this, &AFloorSwitch::OnOverlapEnd);
매개변수가 조금 다르다. 마찬가지로 정의로 이동해서 확인하면 된다.

참고로 해당 이벤트들은 블루프린트 디테일 탭에서도 확인할 수 있다.
구현은 C++로 할 것이기 때문에 이벤트그래프에는 나오지 않는다.
// FloorSwitch.cpp
void AFloorSwitch::OnOverlapBegin(UPrimitiveComponent* OverlappedComponent, AActor* OtherActor, UPrimitiveComponent* OtherComp, int32 OtherBodyIndex, bool bFromSweep, const FHitResult& SweepResult)
{

    UE_LOG(LogTemp, Warning, TEXT("Overlap Begin."));
}

void AFloorSwitch::OnOverlapEnd(UPrimitiveComponent* OverlappedComponent, AActor* OtherActor, UPrimitiveComponent* OtherComp, int32 OtherBodyIndex)
{

    UE_LOG(LogTemp, Warning, TEXT("Overlap End."));
}
내용은 우선 로그를 찍는걸로 간단히 작성한다.
// FloorSwitch.cpp
AFloorSwitch::AFloorSwitch()
{
    // 쿼리만 처리
    TriggerBox->SetCollisionEnabled(ECollisionEnabled::QueryOnly);
    // 오브젝트 타입을 WorldStatic으로 설정
    TriggerBox->SetCollisionObjectType(ECollisionChannel::ECC_WorldStatic);
    // 모든 채널에 대한 충돌 처리를 무시함 (최적화)
    TriggerBox->SetCollisionResponseToAllChannels(ECollisionResponse::ECR_Ignore);
    // ECC_Pawn에 대한 충돌만 허용하고 겹침이 가능하게 함
    TriggerBox->SetCollisionResponseToChannel(ECollisionChannel::ECC_Pawn, ECollisionResponse::ECR_Overlap);
}
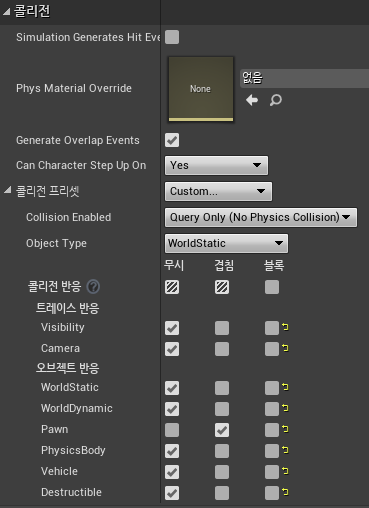
아직 TriggerBox의 충돌 처리를 어떻게 할지 결정하지 않았으므로 충돌 처리를 어떻게 할지 정해준다.
NoCollision은 충돌처리X, PhysicsOnly는 물리만 적용, QuetyAndPhysics는 물리와 쿼리(Overlap시 콜백호출) 둘다, QueryOnly는 물리는 무시하지만 쿼리만 처리한다.

SetCollisionObjectType의 열거형들은 위와 같다.
모든 충돌처리를 무시하면 최적화가 되지만 모두 무시하면 기본적으로 겹침 이벤트가 발생하지 않는다.
하지만 바로 아래 코드를 통해 개별적으로 충돌 처리를 지정할 수 있다.

위에서 작성한 코드는 블루프린트의 디테일 탭에서도 조절할 수 있다.
참고로 Generate Overlap Events가 체크되어있어야 겹침 이벤트가 일어난다.

FloorSwitch라는 블루프린트 클래스로 만들어주고 메시에 큐브를 적용시키고 적당히 조정한다.

이제 월드에 배치 후 캐릭터와 겹치면 로그가 잘 뜬다.
추가로 실습에서 언급하지는 않았지만 트리거로 사용하는 액터는 동적 바인딩으로 이벤트 발생 시에만 콜백이 호출되기 때문에 Tick이 필요가 없다.
생성자의 bCanEverTick을 false로 설정해주고 틱 함수도 날려버리면 된다.
[43. Floor Switch #2]
// FloorSwitch.h
public:
    UFUNCTION(BlueprintImplementableEvent, Category = "Floor Switch")
    void RaiseDoor();

    UFUNCTION(BlueprintImplementableEvent, Category = "Floor Switch")
    void LowerDoor();

// FloorSwitch.cpp
void AFloorSwitch::OnOverlapBegin(UPrimitiveComponent* OverlappedComponent, AActor* OtherActor, UPrimitiveComponent* OtherComp, int32 OtherBodyIndex, bool bFromSweep, const FHitResult& SweepResult)
{
    UE_LOG(LogTemp, Warning, TEXT("Overlap Begin."));
    RaiseDoor();
}

void AFloorSwitch::OnOverlapEnd(UPrimitiveComponent* OverlappedComponent, AActor* OtherActor, UPrimitiveComponent* OtherComp, int32 OtherBodyIndex)
{
    UE_LOG(LogTemp, Warning, TEXT("Overlap End."));
    LowerDoor();
}
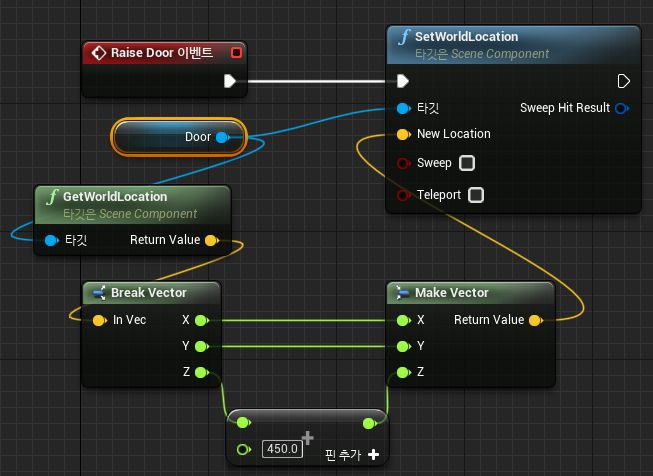
눈여겨 볼 점은 RaiseDoor와 LowerDoor의 구현부가 따로 없다는 것이다.
선언 시 UFUNTION의 속성으로 BlueprintInplementableEvent를 지정해주면 C++ 코드로 구현이 불가능하고 블루프린트에서만 구현이 가능해진다.

기능이 직관적이다. Door(StaticMeshComponent)의 월드 좌표를 받아와서 x, y, z 세 성분으로 쪼갠 후 z축만 450 더한 후 다시 벡터로 조립해 해당 벡터값으로 월드 좌표를 설정하는 것이다.
작동 방식을 확인했으니 구조 개선을 위해 그래프를 모두 지우고 C++ 코드로 넘어간다.
// FloorSwitch.h
public:
    /* Initial location for the door */
    UPROPERTY(BlueprintReadWrite, Category = "Floor Switch")
    FVector InitialDoorLocation;

    /* Initial location for the floor switch */
    UPROPERTY(BlueprintReadWrite, Category = "Floor Switch")
    FVector InitialSwitchLocation;

public:
    UFUNCTION(BlueprintImplementableEvent, Category = "Floor Switch")
    void RaiseFloorSwitch();

    UFUNCTION(BlueprintImplementableEvent, Category = "Floor Switch")
    void LowerFloorSwitch();

// FloorSwitch.cpp
void AFloorSwitch::BeginPlay()
{
    InitialDoorLocation = Door->GetComponentLocation();
    InitialSwitchLocation = FloorSwitch->GetComponentLocation();
}

void AFloorSwitch::OnOverlapBegin(UPrimitiveComponent* OverlappedComponent, AActor* OtherActor, UPrimitiveComponent* OtherComp, int32 OtherBodyIndex, bool bFromSweep, const FHitResult& SweepResult)
{
    UE_LOG(LogTemp, Warning, TEXT("Overlap Begin."));
    RaiseDoor();
    LowerFloorSwitch();
}

void AFloorSwitch::OnOverlapEnd(UPrimitiveComponent* OverlappedComponent, AActor* OtherActor, UPrimitiveComponent* OtherComp, int32 OtherBodyIndex)
{
    UE_LOG(LogTemp, Warning, TEXT("Overlap End."));
    LowerDoor();
    RaiseFloorSwitch();
}
위의 블루프린트에서 작성했던 내용은 모두 지우고 타임라인을 사용해보도록 한다.


더블클릭 해서 들어가면 해당 창이 뜨게된다.
좌상단의 이름을 DoorElevation으로 지정한다.
Shift를 누른 상태로 클릭하면 키 프레임이 설정 된다. 2개를 만들어주고 [0초, 0] [0.75초, 450] 으로 설정한다.
키프레임 두개를 선택하고 [우클릭-자동]을 누르면 곡선으로 만들어진다.

밖으로 나오면 Door Elevation이 생성된 것을 볼 수 있다.

LowerDoor는 역재생을 하면 되므로 Reverse에 연결시켜 준다.
아직 UpdateDoorLocation을 구현하지 않았으니 C++로 돌아간다.
// FloorSwitch.h
public:
    UFUNCTION(BlueprintCallable, Category = "Floor Switch")
    void UpdateDoorLocation(float Z);

    UFUNCTION(BlueprintCallable, Category = "Floor Switch")
    void UpdateFloorSwitchLocation(float Z);

// FloorSwitch.cpp
void AFloorSwitch::UpdateDoorLocation(float Z)
{
    FVector NewLocation = InitialDoorLocation;
    NewLocation.Z += Z;

    Door->SetWorldLocation(NewLocation);
}

void AFloorSwitch::UpdateFloorSwitchLocation(float Z)
{
    FVector NewLocation = InitialSwitchLocation;
    NewLocation.Z += Z;

    FloorSwitch->SetWorldLocation(NewLocation);
}
뒤에 쓸 FloorSwitch까지 같이 구현해준다.
이번에는 BlueprintCallable 속성을 지정해주었기 때문에 구현을 해야 한다.

FloorSwitchTimeline은 [0초, 0] [0.75초, 12] 로 지정해준다.
OnOverlap이 발생하면 타임라인으로 만들어준 보간값이 UpdateDoorLocation에 전달되어서 Z축으로 부드럽게 이동하게 된다.

[44. Floor Switch #3]
트리거가 발동되었을 때, 해당 트리거에서 벗어나도 문이 바로 닫히지 않고 잠시 유지된 후 일정 시간이 지나고 닫히는 문을 구현하려고 한다.
TimerManager를 이용해서 구현해보도록 한다.
// FloorSwitch.h
public:
    FTimerHandle SwitchHandle;

    UPROPERTY(EditAnywhere, BlueprintReadWrite, Category = "Floor Switch")
    float SwitchTime;

    void CloseDoor();

// FloorSwitch.cpp
AFloorSwitch::AFloorSwitch()
{
    SwitchTime = 2.f;
}

void AFloorSwitch::OnOverlapEnd(UPrimitiveComponent* OverlappedComponent, AActor* OtherActor, UPrimitiveComponent* OtherComp, int32 OtherBodyIndex)
{
    UE_LOG(LogTemp, Warning, TEXT("Overlap End."));
    // 매개변수(타이머 핸들, 대상 객체, 콜백함수, 지연시간)
    GetWorldTimerManager().SetTimer(SwitchHandle, this, &AFloorSwitch::CloseDoor, SwitchTime);
}

void AFloorSwitch::CloseDoor()
{
    LowerDoor();
    RaiseFloorSwitch();
}
OnOverlapEnd에 있던 부분을 CloseDoor로 옮기고 대신 타이머 매니저의 SetTimer를 통해 일정 시간(2초)뒤에 CloseDoor가 호출되게 변경하였다.
다만 여기서 문제점이 하나 있다. OnOverlapEnd 이벤트가 발생할때마다 CloseDoor 등록되어 2초 뒤에 호출되기 때문에 몇번 밟았다 떼고 트리거 위에 올라가면 CloseDoor가 실행된다.
이것은 우리가 의도하지 않은 결과이다.
간단하게 해결하는 방법 중 하나는 bool을 이용해 캐릭터가 트리거 위에 올라가 있는지 여부를 판별해서 실행하는 것이다.
// FloorSwitch.h
public:
    bool bCharacterOnSwitch;

// FloorSwitch.cpp
AFloorSwitch::AFloorSwitch()
{
    bCharacterOnSwitch = false;
}

void AFloorSwitch::OnOverlapBegin(UPrimitiveComponent* OverlappedComponent, AActor* OtherActor, UPrimitiveComponent* OtherComp, int32 OtherBodyIndex, bool bFromSweep, const FHitResult& SweepResult)
{
    UE_LOG(LogTemp, Warning, TEXT("Overlap Begin."));
    if (!bCharacterOnSwitch) bCharacterOnSwitch = true;
    RaiseDoor();
    LowerFloorSwitch();
}

void AFloorSwitch::OnOverlapEnd(UPrimitiveComponent* OverlappedComponent, AActor* OtherActor, UPrimitiveComponent* OtherComp, int32 OtherBodyIndex)
{
    UE_LOG(LogTemp, Warning, TEXT("Overlap End."));
    if (bCharacterOnSwitch) bCharacterOnSwitch = false;
    GetWorldTimerManager().SetTimer(SwitchHandle, this, &AFloorSwitch::CloseDoor, SwitchTime);
}

void AFloorSwitch::CloseDoor()
{
    if (!bCharacterOnSwitch)
    {
        LowerDoor();
        RaiseFloorSwitch();
        bCharacterOnSwitch = false;
    }
}
직관적이지만 너무 원시적인 방법이라는 느낌을 지울 수가 없다.
우선은 넘어가도록 한다.

메시도 그럴싸하게 바꿔준 뒤 다시 테스트를 해보면 이제는 여러번 오르락 내리락 한 뒤 트리거에 올라서도 문이 내려오지 않게 된다.
[정리]
- 트리거 이벤트를 처리할 때는 동적 멀티캐스팅 델리게이트를 사용한다. 매개변수 형식은 미리 정해져 있으니 확인 후 똑같이 맞춰주면 된다. 콜리전 설정도 별도로 해준다.
- UFUNCTION의 BlueprintImplementableEvent 속성을 통해 구현을 블루프린트로 떠넘길 수 있다.
- 블루프린트의 타임라인을 이용해서 문의 자연스러운 움직임을 쉽게 구현할 수 있다.
- 일정시간 뒤에 함수를 실행하려면 GetWorldTimerManager().SetTimer()를 사용하자.
'언리얼 엔진 > UE4 C++' 카테고리의 다른 글
| [UE C++] Gameplay Mechanics #3 (0) | 2022.09.07 |
|---|---|
| [UE C++] Gameplay Mechanics #2 (0) | 2022.09.07 |
| [UE C++] The Character Class #2 (0) | 2022.09.06 |
| [UE C++] The Character Class #1 (0) | 2022.09.05 |
| [UE C++] The Pawn Class #2 (0) | 2022.09.05 |
